My mom makes these delicious beef kotlets that my family and I just enjoy so much! She likes to add some sour cream and a tablespoon of softened room temperature butter to help make them flavorful and moist. Additionally, I have added some finely diced kale for some extra nutrients (and as a hidden veggie). Furthermore, this recipe is a great way to help use up any leftover bread-crusts you might have. I like to add bread-crusts to my kotlets as I find they also help make them moist.

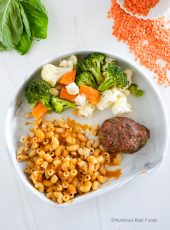
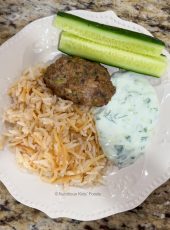
These kotlets are great as part of a quick and easy weeknight meal. Here I have paired it with my Vermicelli Pilaf (which is baked in the oven and the texture of the rice is truly my favorite-it’s fluffy and cooked so well), along with my Grandma’s Tzatziki Sauce and some cucumbers.
Step-by-Step Instructions:
coming soon
Mom’s Beef Kotlets (Cutlets)

These Beef Kotlets are easy to make and great to serve with rice, quinoa, roasted veggies, steamed veggies or just about anything.
- Prep Time: 10
- Cook Time: 20
- Total Time: 30 minutes
Ingredients
- 1 cup cubed bread – cut into 1 inch pieces
- 3 tablespoons whole milk
- 1 pound thawed ground beef, I used Grass-Fed organic beef that’s 85% lean
- 1/2 cup small diced onion
- 1 large egg
- 1/4 cup sour cream
- 1 tablespoon softened unsalted butter, see note below
- 1 cup cilantro, finely diced
- 1/4 cup dill, finely diced
- 1 large kale, finely diced- may add more or less (as desired)
- 1/2 teaspoon sweet paprika
- 1 teaspoon salt
- 1/4 teaspoon ground black pepper
Instructions
- Preheat the oven to 425F.
- Dice a slice of bread into cubes and measure 1 cup (dice more bread if need to measure 1 cup). Transfer the diced bread to a bowl. Add 3 tablespoons of whole milk to the bread and completely break it up with your fingers. Allow the bread to soak in the milk for 5 minutes.
- Add the thawed ground beef to the soaked bread. Also add 1/2 cup of small diced onion, 1 large egg, 1/4 cup of sour cream, 1 tablespoon of softened butter, finely diced cilantro, finely diced dill, finely diced kale, salt, pepper, and paprika.
- Mix the meat mixture.
- Note: I like to wear gloves when handling raw meat. Be sure to wash your hands well afterwards. Also, wash or disinfect anything that the meat has touched (whether that being utensils, surfaces, etc.).
- Gather about 3-4 tablespoons of the meat mixture. Form the meat mixture into same-sized small loaves or kotlets (cutlets) and transfer them to a baking sheet. I used a non-stick ceramic baking sheet. May also line your baking sheet with parchment paper for easy cleanup.
- To a quarter-sized baking dish or any oven-safe deep dish, add some water and place it in the oven on the bottom rack. This will help create moisture in the oven which in turn will help keep the kotlets moist.
- Also, place the baking sheet with the kotlets in the oven. Place it on the rack above the baking dish with the water.
- Roast them in the oven for 15 minutes, then carefully remove the baking sheet and flip each kotlet over onto the other side. Continue to roast in the oven for an additional 7 minutes. Finally, flip the kotlets back onto its original side and roast for 2 more minutes or until they have fully cooked through. Cook times may vary, depending on the size and thickness of the kotlet.
- Remove the kotlets from the oven and allow them to rest for about 5-10 minutes.
- Also, carefully remove the baking dish with the water from the oven and discard the water. Be cautious when doing this as the water and the baking dish are very hot.
Notes
- preheat oven to 400F if using the roast function on your oven.
- if you don’t have softened butter prepared (or at room temperature), just place the butter in a small glass microwave-safe bowl and heat for about 10 seconds (or until the butter has softened a bit). If the butter melts, it’s ok, just add it to the meat mixture.