
I love how quickly this meal comes together and best of all, it is all prepared in one-skillet! First, the chicken gets seared for a few minutes just to help give it some color. Then, the rice gets added, which is later cooked in the oven with some chicken broth and the seared chicken. This process helps give the rice such great flavor. Also, the rice isn’t undercooked and fluffs so nicely with a fork. It truly is one of my favorite dishes.

I personally like to use organic basmati rice and the brand of rice that I like to purchase uses basmati rice that is from California. I have read that white basmati rice from California, India, or Pakistan contains lower levels of arsenic. I also like to rinse my rice before cooking it.

I love the texture and the flavor of the rice when prepared this way. The rice cooks with the chicken which helps impart such great flavor to the rice. Furthermore, allowing this dish to sit after it’s been cooked for about 10 minutes (covered and unbothered) allows the rice to become fluffy.

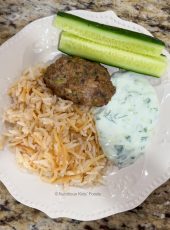
I like to serve this dish with a side of steamed veggies or a veggie salad. My kids enjoy steamed veggies more than roasted veggies so that’s what I have here.
List of Ingredients:

rinsed organic basmati rice (the brand I use is from California), avocado oil, salt, minced garlic, paprika, butter, ground black pepper, diced onions, low-sodium chicken broth, skinless and boneless chicken thighs (here I used pasture-raised)
Disclaimer: when working with raw chicken, it is important to wash your hands well after having touched it. Also, make sure to thoroughly wash/clean/disinfect any object (s) (like knives, cutting boards) or surfaces that the chicken has touched to prevent any cross contamination.
Step-by-Step Instructions:
Preheat the oven to 350F

Pat the chicken dry with a paper towel and toss the paper towel away making sure it doesn’t touch anything else so it doesn’t cross contaminate. Wash your hands.
Note: when handling raw chicken, I personally don’t like to touch it with my bare hands. I prefer to wear gloves, and then I immediately toss the gloves away.

Season the top side of the chicken well with salt, some ground black pepper and some paprika (I like to use sweet paprika).
Note: I do not add too much ground black pepper or paprika so the dish won’t be as spicy. Add as much or as little as you’d prefer.

Heat a skillet over medium heat. Use a skillet that’s oven-safe and with walls high enough to hold your rice, chicken and its liquid. Here I used a braiser.
Allow your skillet to get hot over medium heat. Add the avocado oil

Once your oil is hot enough, place the chicken (seasoned-side down) to the skillet making sure to place it away from you as you’re adding it to the skillet. Also, arrange the chicken in a single layer. If needed, cook the chicken in batches so you are not overcrowding the pan, which can prevent your chicken from browning nicely.
Season well with salt, some ground black pepper, and some paprika to this side of the chicken as well.

Allow the chicken to sear for 4 minutes (uncovered-shown here is a splatter guard). The chicken will also lift from the skillet once it’s ready to flip.

Carefully flip the chicken over, and sear for another 3 minutes or until golden brown.

Carefully, transfer the chicken to a plate. Please note, the chicken won’t be fully cooked at this point. It will continue to cook in the oven with the rice.


Melt 2 tablespoons of unsalted butter. Add 1/2 cup of a diced onion sauté for about 2 minutes while scraping the bottom to remove some of the bits. Then, add the minced garlic cloves and sauté for 20 seconds.


Add 1 cup rinsed basmati rice and toast for 1-2 minutes.


Add 2 cups low-sodium chicken broth and mix the broth in with the rice while scrapping the bottom of the skillet to help release the brown bits (they’re full of flavor). Bring the mixture to a boil, add 3/4 teaspoon salt and mix.
Note: Salting this dish depends on how well seasoned your chickens are. If the chicken is seasoned well, then add 3/4 teaspoon of salt to the broth with the rice.


Add the chicken (and its juices that are in the plate) and bring it back up to a boil.


Cover with a lid, transfer it to the oven, and bake for 20 minutes or until the liquid has been absorbed.

Remove the skillet from the oven and place it on top of your stovetop (with the heat off. This is mainly for air circulation), without removing or opening the lid. Allow it to sit with the lid on for about 10-20 minutes.

Remove the lid and fluff with fork.

Serve and enjoy!
Short Video Tutorial:
One-Skillet Chicken and Rice

A quick and easy meal that comes together in one-skillet.
- Prep Time: 10
- Cook Time: 30
- Total Time: 40 minutes
Ingredients
- 1 to 1.5 pounds of skinless and bone-less chicken thighs (I used 1.3 pounds), I like to use pasture-raised or organic chicken
- 3 tablespoons avocado oil
- 2 tablespoons unsalted butter
- 1/2 cup diced onions
- 3 garlic cloves, minced
- 1 cup white basmati rice, rinsed well
- 2 cups low-sodium chicken broth
- 3/4 teaspoon salt
Instructions
Disclaimer: when working with raw chicken, it is important to wash your hands well after having touched it. Also, make sure to thoroughly wash/clean/disinfect any object (s) (like knives, cutting boards) or surfaces that the chicken has touched to prevent any cross contamination.
- Preheat the oven to 350F
- Pat the chicken dry with a paper towel and toss the paper towel away making sure it doesn’t touch anything else so it doesn’t cross contaminate. Wash your hands. Note: when handling raw chicken, I personally don’t like to touch it with my bare hands. I prefer to wear gloves, and then I immediately toss the gloves away.
- Season the top part of the chicken well with salt, some ground black pepper and some paprika (I like to use sweet paprika). Note: I do not add too much ground black pepper or paprika so the dish won’t be as spicy. Add as much or as little as you’d prefer.
- Heat a skillet over medium heat. Use a skillet that’s oven-safe and with walls high enough to hold your rice, chicken, and its liquid. Here I used a braiser.
- Allow your skillet to get hot over medium heat. Add the avocado oil
- Once your oil is hot enough, place the chicken (seasoned-side down) to the skillet making sure to place it away from you as you’re adding it to the skillet. Also, arrange the chicken in a single layer. If needed, cook the chicken in batches so you are not overcrowding the pan, which can prevent your chicken from browning nicely.
- Season well with salt, some ground black pepper, and some paprika to this side of the chicken as well. Allow the chicken to sear for 4 minutes (uncovered). The chicken will also lift from the skillet once it’s ready to flip. Carefully flip the chicken over, and sear for another 3 minutes or until golden brown. Carefully, transfer the chicken to a plate. Please note, the chicken won’t be fully cooked at this point. It will continue to cook in the oven with the rice.
- Melt 2 tablespoons of unsalted butter. Add 1/2 cup of diced onions and sauté for about 2 minutes while scraping the bottom to remove some of the bits. Then, add the minced garlic cloves and sauté for 20 seconds. Add 1 cup rinsed basmati rice and toast for 1-2 minutes. Add 2 cups low-sodium chicken broth and mix the broth in with the rice while scrapping the bottom of the skillet to help release the brown bits (they’re full of flavor). Bring the mixture to a boil, add 3/4 teaspoon salt and mix.
- Note: Salting this dish depends on how well seasoned your chickens are.
- Add chicken (and its juices that are in the plate) and bring it back up to a boil. Cover it with a lid, transfer it to the oven, and bake for 20 minutes or until the liquid has been absorbed. Remove the skillet from the oven and place it on top of your stovetop (with the heat off. This is mainly for air circulation), without removing or opening the lid. Allow it to sit with the lid on for about 10-20 minutes.
- Remove the lid and fluff it with a fork.
- Serve and enjoy!


This was so good and easy to make! The rice was so flavorful! Thank you for making the steps so easy to follow! Will plan to make again!
It makes me so happy to know you enjoyed the recipe! Thank you for trying the recipe and for your feedback 🙂